
I picked up the book Made to Stick after reading about it on the Presentation Zen blog. As with all the books I read now that I like, I checked out the author blog and decided to subscribe. The book, and the blog, are very teacher friendly. Seeking to answer the questions Why do some ideas thrive while others die? And how do we improve the chances of worthy ideas?, the information they present can surely help any teacher make his/her lessons stickier. In fact, the authors often talk about how to their strategies in the classroom.
Several of their recent blog posts caught my attention. Check out Oceanography, Amplified; 100 Books for 100 Stories; and The Screaming Man in the Four Stroke Engine.
The strategies they present seem very much like those used in an inquiry-based approach. Check it out and see if you agree.
Technorati Tags: Made to Stick, education, blogs
Check out: www.misterteacher.com | Digital Cameras in the Classroom | Alphabet Geometry
Showing posts with label inquiry. Show all posts
Showing posts with label inquiry. Show all posts
Thursday, November 22, 2007
Tuesday, November 06, 2007
Forever Young: Why I Love Teaching So Much
 Have you ever heard of the Blue Man Group? Chances are you've seen this rather odd threesome on a television commercial or even in person at one of their live performances. They're the ones who can drum up a melody by striking instruments made out of PVC pipes.
I've always found their antics quite entertaining; enough to catch one of their shows the last time I was in Vegas. That was several years ago and lately my interest in them has been renewed through a project that my students will be working on next week. To end our unit on sound--a unit where students learn about how frequency and pitch are related--my students will be building an instrument out of PVC pipes. I introduced the idea to them a few weeks ago and they have been anxiously waiting to get started ever since.
I'm convinced of the benefits my students will reap from the project. In addition to learning about sound, they'll have the pleasure of building and testing an instrument that provides them with some application of their learning. As I have been preparing the kids for the project, I've also realized how satisfying it has been and will be for me. I've been building my own instruments at home so that the kids could have some examples to work from. Let me tell you, building these instruments is a lot of fun! And I feel like the only reason I can build them is because I'm a teacher. Surely, my wife would never allow me to spend the time and money that I have working on them if I was just doing it for fun! Teaching fifth grade allows me to play, to stay young (forever a ten year-old). That is what these kids need. They don't need desks in rows, worksheets, and constant read-alouds from textbooks. They need playful projects like this to engage them.
Photo Credit
Friday, September 14, 2007
Bye Bye Blogs, Hello Think.com
 I made a decision this school year that I thought I would never make: the decision to give up using blogs in my classroom. 21Publish, a provider I had used for two years, simply does not have enough control over the ads that show up on their free blogs. So when the ad "Find your perfect lover" started showing up on my fifth grade student blogs from last year, I decided to move on. It was really not a difficult decision though as I had already tested a product with the same capabilities, Think.com. Think allows my students to post text, photos, video, and even interactive stuff like polls and debates on their sites. Although there is no comment feature, students can still give and receive feedback through "stickies," which are posted at the bottom of their webpages.
Here are a couple projects that I've either completed or I am currently working on for Think:
A Science Fair for the 21st Century
When you think of the traditional science fair, what comes to mind? A gymnasium or an auditorium full of students standing in front of three panel backboards?
This past spring my fifth grade students completed science fair projects in an altogether different way. The overall purpose did not change--students were still learning about the scientific method by independently developing and conducting a scientific investigation and communicating the results. The method of communicating and presenting the investigation changed: instead of using a three-panel backboard, students presented their work on their own personal Web sites. I called this project the Online Science Fair.
Stick or Switch Project
Think.com has a very nice projects feature. It allows teachers to set up one or more project sites and designate members who can post material to the project pages. This fall my students will be doing what has become an annual project for my classes, using experimental probability to determine the best strategy for the Let's Make a Deal game--stick or switch? On Think I created a project site with a summary page; a directions page--complete with a poll that asks students what they think the best strategy is before they play--with links to the website where the can play the game; and a final page where I will post three graphs of their data. On this page students will vote for the graph that they think best represents the data. They will be able to see the votes of the other students and read their reasoning.
With so many possibilities publishing their work on Think, I can see my students working on projects that aren't even required and will not even be graded! They are fired up about this technology and so am I...
Technorati Tags: Think.com, education, blogs
Check out: Acute Angles | Obtuse Angles | Right Angles | Digital Cameras in the Classroom
Friday, July 20, 2007
What Makes a Good Field Trip?
 Yesterday I completed a week long science course called the Southwest Ohio Science Institute. The purpose of the course was to give area teachers the knowledge we need to implement an inquiry-based approach to teaching science standards. During the week we covered such topics as the properties of water, the cycles of the earth and its place in the solar system, and thermal energy. Activities were often conducted using inquiry, meaning they were hands-on and followed a series steps--engage, explore, explain, and elaborate. The only day that we did not learn through this was approach was Tuesday.
That day, by far the most enjoyable for me, was field trip day. Sixteen of us were given a tour of a wastewater treatment facility and the Bolton Water Treatment Plant with a trip to the Great Miami River to do some stream testing tucked in the middle. The tours of the treatment plants, conducted by knowledgeable representatives, did far more for my learning of the water treatment process than any diagram, explanation, or even video could have done. Physically moving around the facilities and seeing the different steps involved engaged me at a different level.
The trip to the river was even more powerful. As a teacher, almost ALL of the learning I do is pedagogical. The goal of so many courses or workshops for teachers is to improve our teaching by introducing us to new instructional strategies. On Tuesday, I had a different experience--I got to do the work of a real scientist.
Our group got to do some basic water quality tests on the river. We did this in two ways: (1) wading into the river and searching for certain pollution tolerant macro invertebrates and (2) running chemical tests on the water, looking for certain pollutants. It might not have been sophisticated work, but it still gave me the feeling that I was doing something a real scientist might do.
The whole day got me thinking: What makes a good field trip? It seems like so many of the field trips I've been on with my students were planned with good intentions, but were really no better than a watching a video (museum tours). Other trips were planned because the experience was one we thought the kids should have (watching a film on an IMAX screen). However, are these the type of trips kids should be taking? Would a scientist consider a trip to the movies field work?.
Thursday, July 05, 2007
Learning about variables with digital cameras
Below you'll find a couple of the projects from the Online Science Fair that took place in my classroom this past spring (2007). They are actual photos that students took to show what the variables were in their experiments.
 Question: My question is, when you drop a 3 ounce ball from 4 inches above, does a spoon fling a marble higher if the leverage is smaller?
Hypothesis: I think that if the lever is smaller then the marble will fly higher.
Variable: My variable is the different notches on the spoon.
Results: My results were that if the lever is closer to the end of the spoon, the marble will fly higher.
This is a great experiment on the position of the fulcrum of a lever and the lever's resulting strength. Since we did not study levers this year, this student never learned the associated vocabulary. But with this simple photo, he has illustrated his variable.
 Question: Does the size of a marble affect how fast it sinks?
Hypothesis: If the marble is smaller, then it will sink faster.
Variable: small, medium, large, and extra large marbles
Results: I leared that the more mass an object has, the faster it will sink. The big marble had more mass, so it sank faster.
Once again, a great experiment where the student has learned about something that we did not study in class this year. Also once again, this simple photo has illustrated his variable.
Next Year
Looking at these photos, I realize how much they will help me next year. I can easily use the marble photo to teach variables. Imagine the following problem:
- Dave wants to see which size marble will roll the farthest down a ramp. He takes three books and places a cardboard ramp on top of them. Then he takes four marbles of different size (refer to the photo) and rolls them down the ramp one at a time. He measures the distance each rolls. What is the variable in the experiment?
- Referring to the photo, ask students what changed in the experiment.
- Then show the next photo. Here's the scenario: Kerry wants to see if the length of a string a affects the speed of a pendulum. He measures three pieces of string (12 in., 18 in., and 24 in.) and creates three pendulums with them. He then swings them and counts the number of swings for 10 seconds. What is the variable?

More on digital photos: Future of Math: Digital Images and Digital Cameras in the Classroom.
Technorati Tags: education | digital cameras | science
Technorati Tags: education | digital cameras | science
Wednesday, April 04, 2007
Engaging Students in Inquiry with Digital Images
 I took this photo during some explorations my class was doing with light last week. After seeing it, I wish I had taken it before the exploration and used it to engage my students in the activities that were to come.
A photo like this--projecting onto a screen or copied onto a handout--is great for arousing students' curiosity. Why does the straw appear to be broken? Why does it happen at the surface of the water? What does light have to do with it?
Generating questions like these is the first step in engaging students in inquiry-based learning. They give students a reason to explore; a reason for doing the activities that are basis for concept development.

To the right is another photo I took during the same explorations. Can you make the connection between this photo and the one above? What is the concept? Hint: Notice how the beam of light breaks when it enters the water and then again when it leaves.
Technorati Tags: education | digital cameras
Check out: Digital Cameras in the Classroom | Spreadsheets in the Classroom | Alphabet Geometry
Saturday, March 03, 2007
Thank You Best Buy
Inquiry-based science + 8 digital cameras + Web 2.0 = Online Science Fair
Thank you to Best Buy for deeming the above project idea worthy of a $2,500 Best Buy Teach Award.
Digital Cameras in the Classroom | Spreadsheets in the Classroom | Alphabet Geometry
Technorati Tags: education | digital cameras | blogs
Online Science Fair is an effort on my part to integrate digital media and inquiry-based science. As a fifth grade science teacher, the goal of my program is to ensure that my students are able to think and communicate scientifically. However, I want to make my teaching relevant to the students in my classroom. One way I do this is by bringing digital media into the classroom. The current generation of students I have in my classroom has grown up surrounded by digital media. I want to design a program that enhances inquiry-based science investigations by incorporating photographic images taken with digital cameras. This is nothing new for my classroom--I have had my students upload images to their blogs for projects before to explain the experimental process.
Online Science Fair will allow these projects to become even more in depth. With eight digital cameras, my students will be able to take photos of every step of the scientific process and document their experiments more effectively. Photographic images will enable all my students to remember the steps taken in the scientific process and communicate them effectively.
Interested in taking part? We'd love to do this project with another class. Comment on this entry to express your interest.
Digital Cameras in the Classroom | Spreadsheets in the Classroom | Alphabet Geometry
Technorati Tags: education | digital cameras | blogs
Tuesday, January 02, 2007
A Dream in the Works for My Digital Kids
 Today I got some of the best news I've heard at school in years. After a couple weeks of mystery, I learned from my district tech guy that I will in fact be able to bring the game Wildlife Tycoon: Venture Africa to my classroom.
My students will be learning about ecosystems from a video game!
I plan to use this space to record the goals, reflections, assignments, lesson plans, links, photos, and much more as the project develops.
Thursday, November 30, 2006
Paper Airplanes, Online Presentations
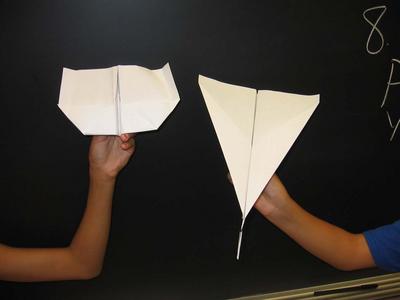 Paper Airplane Lesson Plan
In my effort to create an online archive of lesson plans that stresses quality over quantity, I've added another of my more successful science lessons to my website. It's about paper airplanes and the scientific method. Here's a brief overview of the lesson:
Students work with a partner to create two paper airplanes, each with a different design. They then fly the paper airplanes a set number of times and observe how far each goes. The lesson acts as a perfect introduction to the scientific method. Through it, students learn how to:
- Ask scientific questions
- Formulate hypotheses
- Clearly write procedures
- Collect data
- Draw conclusions
- Identify variables
The lesson has three stages: an observation period, a whole class experiment, and student experiments. An optional fourth stage would be a presentation of results. It also offers many opportunities for the incorporation of technology. Tech tips appear throughout the lesson.
Click here to download and view the lesson.
Online Presentations - Which site is best?
- About a month ago Tim Lauer posted about SlideShare, a site where you can upload a preexisting PowerPoint or OpenOffice slideshow. This is pretty handy since it means you no longer have to save your shows as a web page and then upload them to a server. Of course, the site is a also about social networking as users can tag presentations and comment on them as well. Here's SlideShare's major limitation: there's no way to publish a notes page. My slides are simple--they mostly contain a photo, a sentence, phrase, or sometimes just a single word. Bullet points are scarce in my presentations. Therefore, it's hard to get much information from them if I can't publish a notes page.
- Another site that I have tried is Thumbstacks. This site allows users to actually create, edit, and share the slideshow online. It's full of great features, unless you're into animations and transitions, it doesn't support those yet. But, once again, it doesn't have a notes page.
- Embedding a flickr slideshow works best if you have notes about each slide that you'd like to share with others. However, the slides come from photos in your archive and I can't imagine trying to turn my PowerPoint slides into images and uploading them to my flickr account.
Technorati Tags: Thumbstacks | SlideShare | teachers
Check out: Digital Cameras in the Classroom | Spreadsheets in the Classroom | Technology in the Classroom
Saturday, July 15, 2006
Answering My Own Questions
In my last post I was wondering how to go about conducting a Socratic dialogue with my fifth-grade students. I asked if it anyone thought students of this age had the attention span to sit a through a discussion of this depth. I also inquired about how to conduct one of these dialogues with my students since I had never done one before.
Shortly after posting I went after my own answers. It turns out most of the answers I am seeking I already had. I have been reading a book titled Socrates Cafe, in which the author (Christopher Phillips) describes various discussions he facilitates at cafes, schools, churches, and other places using the Socratic method. Interested in learning more, I went to his website (called the Society for Philosophical Inquiry) to learn about how to conduct my own Socrates Cafe and found a guide for doing just that.
Here I found answers to the following questions:
Blogs in the Classroom | Digital Cameras in the Classroom | Integrating Technology
Shortly after posting I went after my own answers. It turns out most of the answers I am seeking I already had. I have been reading a book titled Socrates Cafe, in which the author (Christopher Phillips) describes various discussions he facilitates at cafes, schools, churches, and other places using the Socratic method. Interested in learning more, I went to his website (called the Society for Philosophical Inquiry) to learn about how to conduct my own Socrates Cafe and found a guide for doing just that.
Here I found answers to the following questions:
- How do I decide on a question for discussion?
- How do I launch a discussion on the chosen question?
- How do I deal with people who monopolize the conversation or who do not show respect for other participants?
- How can I encourage people to speak?
These are pretty much the same questions teachers need to answer if they are interested in classroom Socratic dialogues.
Framing a Suitable Question
The answer to the first question is obvious: any question up for discussion must come from the curriculum. The difficult part is deciding on how to frame the question. On the site goodcharacter.com, authors David Elkind and Freddy Sweet state that hypothetical situations are “…powerful springboards for discussion.” They force students to take a position. Here some examples that I thought of:
- A man burns an American flag to protest the Iraqi war. Should he be arrested?
- What would life be like if circles did not exist?
The site studyguide.org lists several different types of questions to ask during a Socratic seminar:
- A world-connection question
- An open-ended question
- A close-ended question
- A universal theme/core question
Guiding the Discussion
Once the discussion has started, begin to examine responses in a “Socratic” way. Look for the following:
- Built-in assumptions (Is burning a flag a crime?)
- Embedded concepts (What does it mean to protest?) (What is a circle?)
- Differences of kind and degree (What other types of protest are there?) (What other shapes appear to be circular?)
- Logical inconsistencies
When answering questions, it is important that participants offer specific examples that back up their responses. The teacher should try to get them to support their perspectives with well-constructed, reasoned views.
Allowing for Participation
First and foremost, it is extremely important to create a comfortable environment where everybody feels safe to speak. Make sure that there is no putting others down and no discussion is forced on those who do not desire it. If a student is not participating in the dialogue, gently ask them about their thoughts on a particular question.
A dialogue is meant to collaborative, not oppositional. The goal is to submit one’s views to the analysis of others and use it to learn or expand those views.
Questions- Could this work with blogs?
- How do we assess students during a Socratic dialogue? Are we assessing knowledge of the subject matter, reasoning, or participation?
Blogs in the Classroom | Digital Cameras in the Classroom | Integrating Technology
Sunday, July 02, 2006
Speaking of Socrates...
...is there any value to using Socratic dialogues with younger students (fifth grade)? Do students this young possess the ability (or the attention span) to sit through an extended discussion?
While I have never conducted a Socratic dialogue, I am interested in doing a few with my classes this coming school year. How does one go about doing this? From what I have read, it sounds a lot like inquiry-based learning, except that the inquiry is done completely through discussion, not through actual experimentation. Is this correct?
Blogging in the Classroom | Digital Cameras in the Classroom | Symmetry in Nature
Technorati Tags: teachers | education | learning
Saturday, July 01, 2006
Is it Inquiry or Problem-Based Learning?
There's been quite the buzz in the southwestern Ohio area lately about inquiry-based learning. Firstly, my school district's super has adopted this approach in an effort to keep test scores the highest in the state. As a result, we have spent a lot of time during inservice days listening to consultants define exactly what inquiry-based learning is and then planning inquiry lessons and units in grade level and subject area teams.
But the enthusiasm for this approach doesn't end in my district. I recently presented at a conference here in Cincinnati called Integrating Science, Mathematics, and Literacy. The focus of many of the conference sessions was inquiry-based learning.
Questions, Questions, Questions
Blogging in the Classroom | Digital Cameras in the Classroom | Symmetry in Nature
Technorati Tags: teachers | education | learning
But the enthusiasm for this approach doesn't end in my district. I recently presented at a conference here in Cincinnati called Integrating Science, Mathematics, and Literacy. The focus of many of the conference sessions was inquiry-based learning.
Questions, Questions, Questions
- I've learned quite a bit about this approach, but all of the information has left me a little confused. Many of the lessons that are considered inquiry seem to me to fall under project-based learning. Students are systematically creating an artifact, but they don't seem to be generating questions as they go. How do we distinguish between project-based and inquiry-based learning?
- Aren't inquiry-based learning and problem-based learning the same thing? If so, why make a distinction between the two? I know that true inquiry must result from student-derived problems. But I've seen continuums that state that inquiry can also result from teacher-derived problems.
- Shouldn't all inquiry-based lessons begin with some sort of question or problem? In college, I learned that inquiry begins in one of three ways: discrepant events, a question, or by inquiring into the identity of an object, piece of art, etc.
- Is this an example of an inquiry-based lesson?
Blogging in the Classroom | Digital Cameras in the Classroom | Symmetry in Nature
Technorati Tags: teachers | education | learning
Sunday, April 16, 2006
Solar Energy: A Lesson Plan & A Blog WebQuest
Ohio Standards - (with my annotations)
- Science (Grade 6) -
- Physical Science
- Explain that energy derived from renewable resources is assumed to be available indefinitely. (from textbook)
- Science & Technology
- Explain how decisions about the use of products and systems can result in desirable or undesirable consequences. (after finishing, compare solar energy to nonrenewable resources)
- Design and build a product or create a solution to a problem given one constraint (environmental effects). (how does technology like solar collectors reduce environmental pollution?)
- Scientific Inquiry
- Distinguish between observation and inference. (Students observe temperature increase and then make inferences about hypotheses)
- Explain that a single example can never prove that something is always correct. (test the solar collectors over two days)
- Scientific Ways of Knowing
- Describe why it is important to keep clear, thorough and accurate records. (students can repeat other students' experiments)
Materials & Technology
The webquest portion of this lesson replaces the traditional mode of introducing a classroom project to students. Typically, I type up a handout that lists the requirements and a scoring guide and go over it in class. Students will learn about all of this and more through the WebQuest.
The project students will be working on is creating a solar collector (or cooker or oven). The goals of this project are:
Create a rubric using the requirements for the final blog entry above.
Student examples by the end of the week!!
Check out: Alphabet Geometry | Symmetry in Nature | Classroom Blogs
Technorati Tags: lessonplans | teachers | blogs | Webquests
- Links to the following websites - Energy Story, Solar Cooking Plans, Catching Sunshine
- Blogs w/WebQuest
- Materials for solar collectors
- Digital Camera
- Spreadsheet Software
The webquest portion of this lesson replaces the traditional mode of introducing a classroom project to students. Typically, I type up a handout that lists the requirements and a scoring guide and go over it in class. Students will learn about all of this and more through the WebQuest.
The project students will be working on is creating a solar collector (or cooker or oven). The goals of this project are:
- Through project-based learning, the kids discover how scientists harness the sun's energy and use it as an alternative to nonrenewable resources.
- The kids develop hypotheses about:
- how the colors and textures that line the inside of the collector affect the temperature increase.
- how to point the cooker to achieve the greatest temperature increase.
- how to insulate it to achieve the greatest temperature increase.
- Students use technology (blogs) to:
- research information about solar energy.
- find out how to build the solar collector.
- communicate with their teacher about learning, collector designs and materials, and more
- to create a line graph of collected data
- (Day One) Introduce students to the terms resources, nonrenewable resources, and renewable resources. Make sure students are aware of examples for each. Finally, discuss benefits and drawbacks of each type of resource. I did this through the textbook.
- (Day Two) Begin WebQuest. Students should complete the first two sections of the WebQuest (Introduction & Task) and communicate their learning to the teacher through the comment link. In this section, students learn about solar energy and how it is used to create electricity. They also learn about various solar cooker designs and the materials used to create them.
- (Day Three) Students read and complete step one in the process section. In this section, they learn about the science behind how the solar collector works. They also get into more detail on the designs and materials needed. Students should have an idea of what design they want to use before the end of day three. In fact, their assignment is to decide on a design and: draw a picture of it, list the materials needed, and write down three questions they expect to answer from it.
- (Days Four & Five) Students construct their solar cookers.
- (Day Six) Students begin testing their cookers. Before doing so, they choose one of the three questions they asked earlier and turn it into a hypothesis. They can choose to alter their own collector for their test or compare their results with someone else. Testing is done by placing a thermometer in the container that students have chosen to put in the middle of their cookers. Read more here. At this point, take photos of students' cookers.
- (Day Seven, Eight, & Nine) Students create a blog entry that summarizes the project. Included in the entry are:
- a line graph that students create with a spreadsheet.
- a photo of their solar collector.
- their question and hypotheses.
- the procedure.
- the results (graph goes here).
- conclusions.
- answers to the discussion questions.
Create a rubric using the requirements for the final blog entry above.
Student examples by the end of the week!!
Check out: Alphabet Geometry | Symmetry in Nature | Classroom Blogs
Technorati Tags: lessonplans | teachers | blogs | Webquests
Monday, March 06, 2006
iTunes and Classroom Read-Alouds
 This week I will be starting The Giver by Lowis Lowery with my sixth graders so this weekend I downloaded the audiobook from iTunes. With my busy schedule (four subjects at school and three two year-olds at home), I have an extremely difficult time reading the books from our reading list.
 After listening to the first few chapters I began to think of the potential these mp3 audiobooks have for the classroom. Having students listen to books on tape has always been a strategy that teachers have employed to assist struggling readers. Times have changed and tape recorders and books on tape have mostly been replaced by CD players and books on CD.
Ideas for mp3 Audiobooks
Well, time is still marching on and although CD books still dominate the audiobook market in schools, I'd like to propose a change. For The Giver, I have a few ideas for how I'd like to use the mp3 version of the book:
- Keep a copy on my home computer and one on my school computer. This way, I can listen while I work, wherever I might be.
- Play certain chapters aloud through my computer for my students. (Side note: Imagine playing the book through the Logitech mm50 compact speaker system. Okay, so the speakers may add no value to the lesson; but the kids would think it was the coolest thing ever.) For the reading teachers among us, we're well aware of the benefits of read-alouds, particularly those coming from highly fluent readers.
- I will burn CDs for those students who would like to listen to it on their own. This would especially be helpful to students with reading difficulties. Of course, the same thing can be done with iPods. I am lucky to teach in a pretty affluent school district where a few kids own iPods. Since I am allowed to put the mp3's I download onto as many iPods as I want, I'll simply offer my students the mp3 version of the book to listen to whenever they want.
Subscribe to:
Posts (Atom)


